

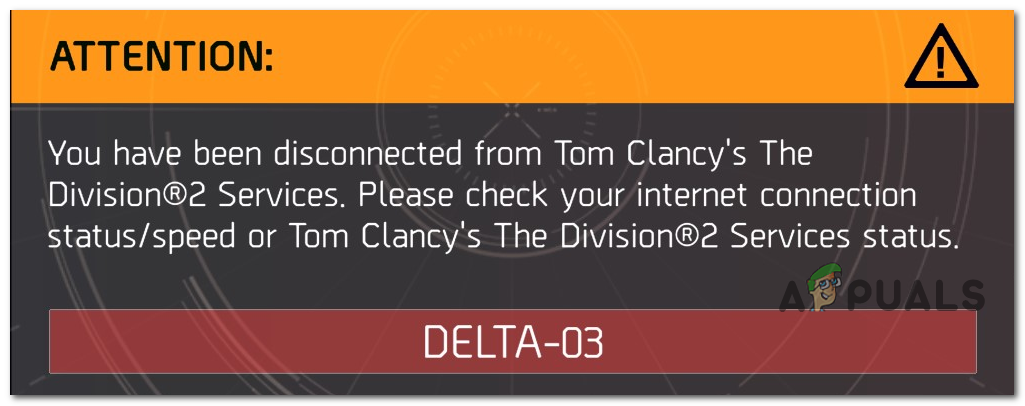
The Division 2 Error Delta 03
Some Division 2 players are getting disconnected every couple of minutes with the error code Delta-03. This problem is reported to occur on both PC and consoles (Playstation four and Xbox 1).
As information technology turns out, there are several different causes that might be causing this item issue on PCs and consoles:
- Common TCP / IP inconsistency – One of the most mutual instances that volition cause this problem is a fairly typical TCP / IP inconsistency that might appear due to multiple causes. In this case, you should be able to fix the problem either past refreshing the electric current network or by performing a router restart.
- third party security suite interference – As it turns out, this problem can also be caused by an overprotective antivirus or firewall. If this scenario is applicable, you lot should be able to set up this problem past disabling the existent-fourth dimension protection or past uninstalling the security program altogether (if you're using a third party firewall)
- DNS Inconsistency – A DNS assigned from a bad range can too be the main cause facilitating this fault lawmaking with Destiny 2. In this example, there are two ways to set up information technology. You can either affluent the current DNS and force your ISP to renew the IP /TCP configuration from an elevated Control Prompt or you tin make the switch to the DNS provided past Google.
- NAT is airtight – Another common crusade that might trigger this error is an instance where your network NAT is closed. This will end up preventing your calculator from being able to maintain stable connections with external game servers. In this case, yous should be able to set up the issue either by enabling UPnP or by forwarding the ports required by Destiny 2 manually in case UPnP is not supported.
Method 1: Reboot or Reset Router
One of the most common instances that volition trigger this error is network inconsistency. And after investigating this detail issue, it turns out that the vast majority of network inconsistencies related to Partition ii are in actuality caused by routers.
In well-nigh cases, affected users are actually dealing with some type of TCP / IP inconsistency that ends up breaking the connectedness with the Destiny ii server. This trouble is much more common with low-tier routers with a express bandwidth that is tasked with maintaining a connexion where multiple devices are connected to the same network at the same time.
In case this scenario seems similar it could be applicable, start this troubleshooting guide by disconnecting every non-essential device (to the game connection) and see if the random Delta 3 disconnects stop.
In case the problem is still not resolved, consider post-obit one of the two sub-guides beneath to either reboot or reset your router connection.
Notation: If yous want to avoid any information loss, our recommendation is to start with a elementary router restart and then move forrad with the restart process in case the problem is still not resolved.
A. Restarting your Router
A quick router restart will clear almost every inconsistency that is being facilitated by some type of temporary data affecting the TCP / IP connection. This set up has been confirmed to work by a lot of users that were previously encountering the Delta-03fault lawmaking.
To perform a router restart, look to the rear of your router and press the On-Off push button once to cut off ability. Next, press the ability button once to cut off the power to your router, then physically disconnect the power cablevision and wait for a full minute or so to ensure that the power capacitors of your router are completely drained.

One time you have successfully restarted your router and re-initiated your network, wait until internet access is re-established and then repeat the action in Division 2 that was previously causing the Delta-03 mistake lawmaking.
If the problem is still occurring, move down to the adjacent sub-guide below to perform a router reset.
B. Resetting your Router
If the simple router reboot didn't work for you, chances are you're dealing with a more serious network inconsistency that cannot be resolved by a simple network reset. But since there are a lot of dissimilar causes that might be responsible for the apparition of this fault, the most efficient fashion of fixing the majority of persisting network problems is to reset your router dorsum to its factory values.
This will stop up fixing the issue in instances where the problem is beingness caused by some type of modification that you previously operated from your router settings.
Important: Go along in mind that going forward with this method also means that you will articulate any custom settings that you have previously established. This includes any previously forwarded ports, whitelisted devices, blocked devices, custom login credentials, and everything else that you adjusted in your router settings since yous set the network up.
If you understand the consequences and yous want to move forward with this method, you can initiate this operation by pressing and holding on the reset button for 10 seconds or more, or until yous run across every front LED flashing at the same fourth dimension.
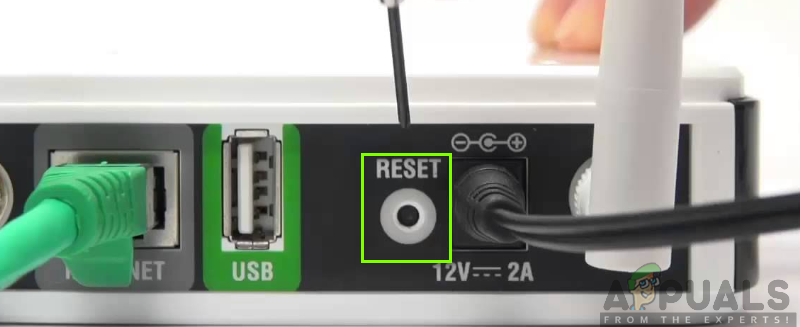
You lot will be able to find the reset push button on the back of your router, merely in most cases, yous volition demand a abrupt object like a small screwdriver or a toothpick in order to reach the button.
If the connexion provided by your ISP is PPoE (Betoken-to-Point Protocol over Cyberspace),yous'll need to continue your Internet service provider credentials at the ready since you'll likely need to set up the connexion again one time the reset process is complete.
In one case yous manage to reset your router successfully and Cyberspace admission is established, repeat the action within Division ii and see if the trouble is now resolved.
If the same problem is still occurring, motion down to the next potential fix below.
Method 2: Disabling / Uninstalling 3rd party Security Suite
If yous're using a 3rd party security suite or firewall, it'south possible then a false positive is actually making it terminating the connectedness with the game server.
This problem is confirmed to occur past affected users with both 3rd party firewalls and tertiary party security suites.
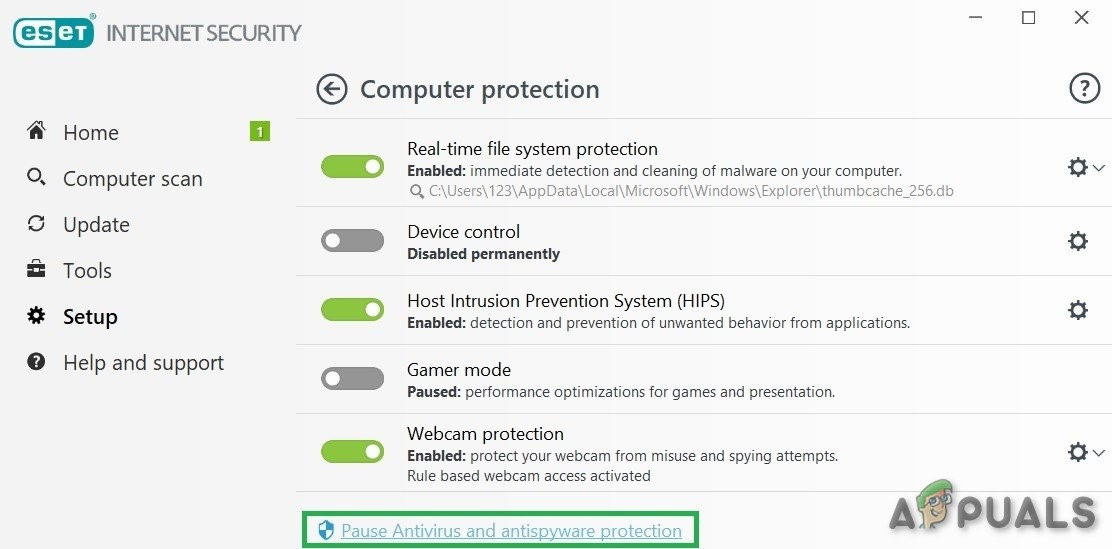
In case you're using a 3rd party firewall, the prepare is as simple every bit ensuring that the security suite is disabled whenever you're actively playing the game. Near 3rd party suites will let yous to do this direct from the tray-icon of the security suite. Simply correct-click on information technology and look for an selection that allows you to disable the existent-fourth dimension protection.
Nevertheless, in case you're using a 3rd party firewall, disabling the 3rd party suite volition likely not exist enough since the same security suite will remain in place even subsequently you lot disable the security mensurate.
In this instance, the only viable fix is to uninstall the allegedly overprotective firewall to determine whether it's interfering with the game or not. If this turned out to exist true, you tin then look for specific instructions on whitelisting executables and ports used by Partitioning 2 in your antivirus.
If this scenario is applicable, follow the instructions below to uninstall the 3rd political party firewall and see if this fixes the problem in your case:
- Press Windows key + R to open a Run dialog box. Next, type 'appwiz.cpl' and press Enter to open up the Programs and Features menu.

Type appwiz.cpl and Press Enter to Open Installed Programs List - Once you lot're inside the Programs and Files menu, scroll down through the list of installed applications and locate the tertiary party firewall suite that y'all want to uninstall.
- When you finally manage to locate it, right-click on the firewall listing and choose Uninstall from the newly appeared context carte.
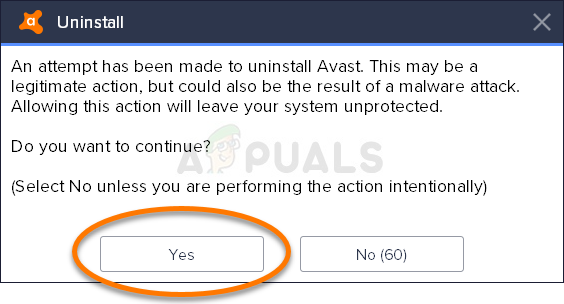
Uninstalling your antivirus tool - Next, follow the on-screen prompts to consummate the uninstallation, then restart your computer and come across if the problem is fixed once the next startup is complete.
In example the same outcome is still occurring, move downward to the side by side potential fix below.
Method iii: Flushing / Irresolute DNS
Every bit it'south been confirmed by several affected users, this problem can as well occur due to a Domain Name Address (DNS) inconsistency. This scenario is even more likely if you're encountering similar errors with other multiplayer games.
If this scenario is applicable, in that location's a run a risk that your Internet service provider has assigned a bad DNS address that makes information technology difficult for your estimator to maintain connections with sure multiplayer games.
In this case, you can resolve the issue in two different means – you can either flush the DNS and then fore an IP / TCP renewal from an elevated CMD prompt or y'all can make the switch to the DNS provided by Google to hopefully improved your network reliability.
Start with sub guide A (Flushing and Renewing your DNS) and see if it ends upwards fixing the Delta-03error in Partitioning ii. If the same problem is however appearing, motility over to sub guide B (making the switch to the DNS provided by Google.
A. Flushing & Renewing the DNS
- Press Windows key + R to open up a Run dialog box. Side by side, type 'cmd' and press Ctrl + Shift + Enter to open an elevated Control Prompt. When yous're prompted by the User Business relationship Control (UAC), click Yep to grant admin access.
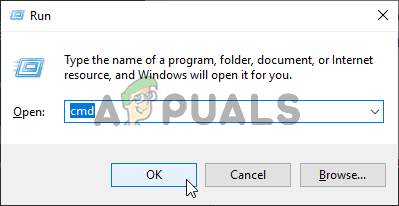
Opening the Command Prompt - Within the elevated Command Prompt, type the following control and press Enter to affluent the current DNS:
ipconfig /flushdns
- Next, type the following command and striking Enter in one case again to renew the IP configuration:
ipconfig /renew
- Once the IP has been renewed, you tin close the elevated Command prompt and launch Division 2 to see if the problem is now resolved.
- In case the same problem is still occurring, move down to the side by side potential fix below.
B. Switching to Google DNS
- Press Windows key + R to open up a Run dialog box. Next, type 'ncpa.cpl' and printing Enter to open upwards the Network Connections menu.

Run this in the Run dialog box - Once you lot're within the Network Connections card, get ahead and right-click on the network that y'all're actively using. In case you're currently connected to a wireless network, right-click onWireless Network Connexion (Wi-Fi),then click on Properties from the context menu that simply appeared.
Note: In instance you are connected via a wired cable, right-click on Ethernet (Local Expanse Connection) instead. - Afterwards you lot are finally inside the Backdrop window, go ahead and click on the Networking tab from the menu at the top. Next, get to the module namedThis connection uses the following itemsand selectInternet Protocol Version four (TCP / IPv4)and click on the Properties button.
- Once you get to the next screen, click on the General tab, then enable the toggle associated withUse the post-obit DNS server address.Next, go ahead and replace the Preference DNS Server and Alternating DNS serverwith the following values:
eight.8.eight.8 8.8.four.iv
- After the values take been adjusted accordingly for TCP / IPV4, do the same matter with Internet Protocol Version six (TCP / IPv6)and make sure you use the following values instead:
2001:4860:4860::8888 2001:4860:4860::8844
- Once you have successfully made and saved the changes, you have successfully fabricated the switch to the DNS provided by Google.
- In this example, open up Division 2 again and encounter if the problem is now resolved.
In case the same problem is still occurring, move downwards to the next potential gear up below.
Method 4: Forwarding the Ports used by Division two
If none of the methods above have worked for you lot, chances are y'all're dealing with a closed NAT (Name Accost Translation) that is preventing your endpoint computer from connecting to the game server.
In this instance, you have two means forward – You lot tin either enable UPnP (Universal Plug and Play) or you can forward the ports used by Partition two manually. What this essentially does is immune your router to automatically forrad the ports that are being used past trusted games and applications that your devices are attempting to connect to.
This is certainly the preferred approach, simply not every router model volition back up this feature. In example you're using an older router that doesn't support UPNP, the only way of getting this effect resolved is to forward the required ports manually. Hither's a quick guide on how to do this:
Note: These steps are only for orientation purposes every bit the verbal screens you'll run across will vary depending on your router manufacturer. But generally, the steps of reaching the Port forwarding screen are very similar across the majority of manufacturers.
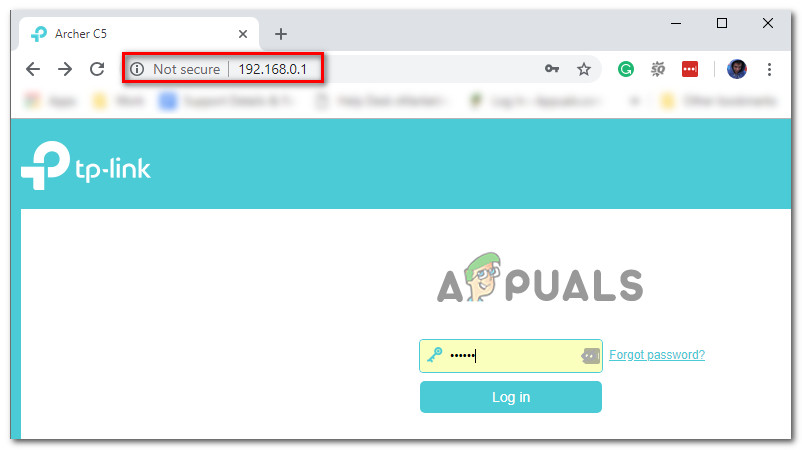
- Open upward your default browser and type your router accost straight into the navigation bar and press Enter to access your router settings:
192.168.ane.one 192.168.0.one
Note: In the vast majority of cases, one of these 2 addresses should allow accessing your router settings. But in case you lot accept previously established a custom network address for your router, here's how to find the IP accost of your router from any device.
- One time you lot arrive within the initial login screen, type the custom credentials if you previously established whatever. In case it'southward the first fourth dimension you get to this screen, endeavor out the default credentials that most router manufacturers utilize – admin or 1234 (for both admin and countersign).
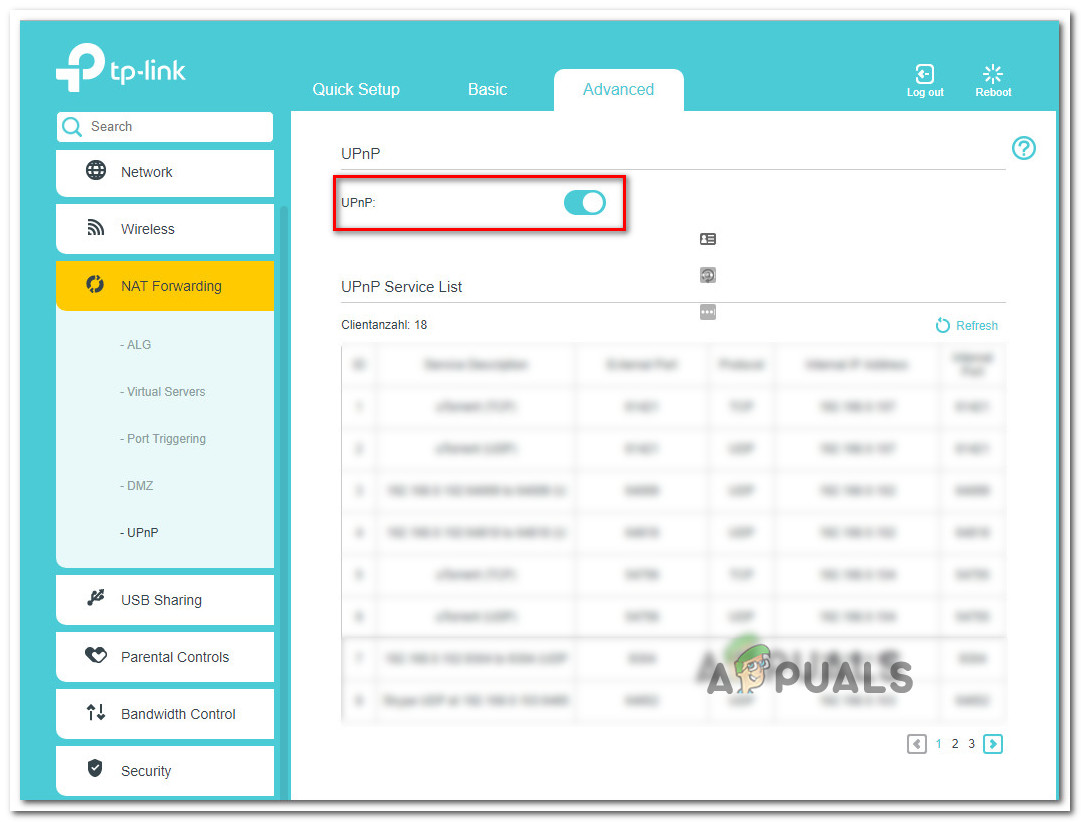
Accessing your router settings - One time you are inside your router settings, look for a mode to access the Avant-garde (Expert) menu, and encounter if you tin spot an pick named NAT Forwarding or Port Forwarding.
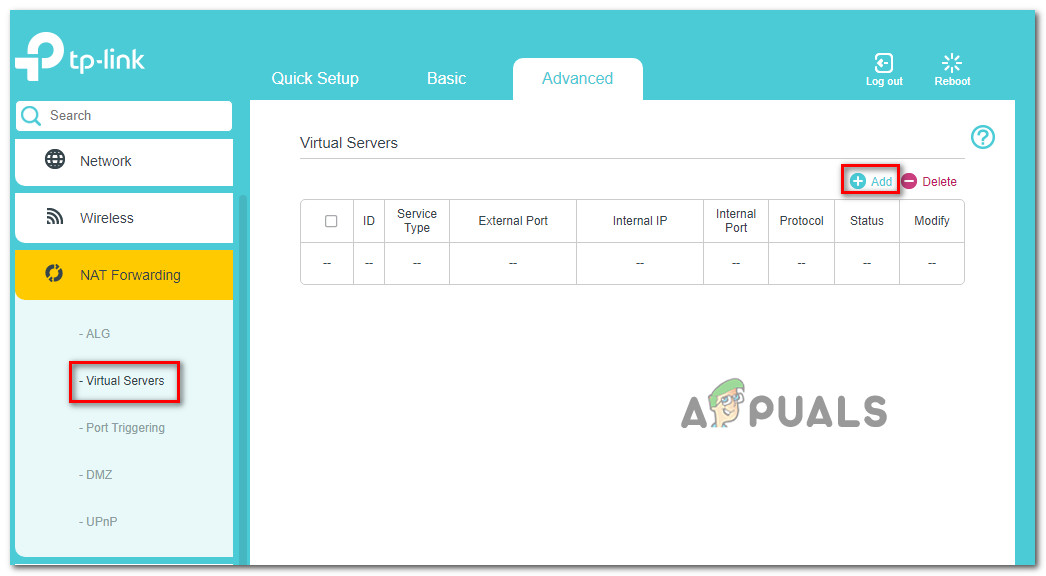
Adding ports to the Forwarding list - Once you get to the port forwarding screen, become alee and forward the post-obit ports that Destiny two uses on PC, PS4 and Xbox One:
TCP: 13000, 27015, 51000, 55000, 55002 UDP: 22000-22032
- Once the ports are successfully forwarded, open Partition 2 again and see if the random disconnects are even so occurring.
![]()
Source: https://appuals.com/division-2-delta-3-error-code/
Posted by: lemosstrught.blogspot.com
0 Response to "The Division 2 Error Delta 03"
Post a Comment